blog
Best Practices for MySQL Backups

If you’re working with MySQL and you want to use some best practices, there are a lot of options you can focus on. Aside from performance tuning, engine and query optimization and replication configuration, you can also take a look at a couple of best practices for MySQL backups. We will try to do that in this blog post. Keep in mind that we will not be covering absolutely everything backup related (for example, PITR is out of scope), but this post should provide some insight regardless.
Categories of Backups in MySQL
In MySQL, backups can be categorized into two types – logical backups and physical backups. In general, logical backups recreate the statements necessary to recover your data while physical backups consist of raw copies of the directories and files that store database contents. We will take a deeper dive into them now.
Logical Backups in MySQL
As already mentioned, logical backups recreate the statements in order to recover data. As far as logical backups are concerned, there are two tools that can be used for this purpose – mysqldump and mydumper.
The mysqldump client utility is used to dump a specified set of MySQL databases for the purposes of backing up data or transferring data to another MySQL server. This tool, in general, does not require much privileges – dumped tables require the user to have at least the SELECT privilege for tables, SHOW VIEWS for views and TRIGGER for triggers. If the –single-transaction option is absent, you need to have the LOCK TABLES privilege and, as of MySQL 8.0.21, if you are not using the –no-tablespaces option, you also need the PROCESS privilege.
The mysqldump utility also has a couple of options (the options can be specified either on the command line or in my.cnf below the [mysqldump] and [client] options). Here’s a few of them:
- The
--helpor-?Option displays a help message and exits. - The
--add-drop-databaseoption adds aDROP DATABASEstatement before eachCREATEDATABASE statement. This option can be useful if you want to recover a backup without having to worry if you have databases with the same name on the server you’re loading the data into. - The
--add-drop-tableoption adds aDROP TABLEstatement before eachCREATE TABLEstatement. This option can be useful if you want to recover a backup without worrying if you have tables with the same name on the server you’re loading the data into. - The
--add-locksoption adds aLOCK TABLESstatement before the table dump andUNLOCK TABLESafter the table dump. Avoid usingLOCK TABLESfor InnoDB – it reduces concurrency. - The
--all-databasesor-Aoption dumps all tables in all databases. - The
--all-tablespacesor-Yoption adds SQL statements needed to create any tablespaces used by the NDBCluster table. - The
--allow-keywordsoption allows the creation of column names that are keywords. - The
--compatible=titleoption makes the backup compatible with other databases or older versions of MySQL. If you’re using older versions of MySQL, this is a goldmine: the accepted values includeansi, mysql323, mysql40, postgresql, oracle, mssql, db2, mexdb, no_table_options, no_field_options. - The
--compactoption produces compact backups. You can also use--skip-compactto not produce more compact output. - The
--databasesor-Boption allows you to dump several databases.
With that being said, keep in mind that mysqldump also has its own downsides – the tool starts at the first database in an alphabetical order, then dumps each table in that database, one at a time meaning that there’s no parallelism, but as a simple backup tool, it should do the job.
If you want to backup and (or) restore very large tables, you should probably look into mydumper. mydumper has been written by Domas Mituzas, Andrew Hutchings and Mark Leith. mydumper, when installed, also has several available options. Here’s some of them:
- The
--helpor-?option shows helpful information. - The
--hostor-hoption allows you to specify a MySQL server to connect to (the default value is localhost). - The
--useror-uoption allows you to define a MySQL username which has the correct privileges. - The
--passwordor-poption allows you to specify a password for the MySQL user. - The
--portor-Poption allows you to specify the port. - The
--databaseor-Boption allows you to specify a database that needs to be dumped. - The
--table-listor-Toption allows you to specify a comma-separated list of tables. - The
--threadsor-toption allows you to specify the number of threads that should be used for dumping data (default value is 4). - The
--outputdiror-ooption allows you to specify the name of the output directory (default isexport-YYYYMMDD-HHMMSS). - The
--compressor-coption allows you to compress the output files.
When using logical backups, also consider security implications. It is best to avoid entering your password on the command line – that way it will not be visible to other users. Instead, store the password under the [client] section in my.cnf and set the file access mode to 400 or 600.
Physical Backups in MySQL
Physical backups backup data at a system level. The way you take physical backups in MySQL differs according to the engine that is in use. To take a physical backup of InnoDB:
- Perform a clean shutdown of your MySQL server (either run the query
SET GLOBAL innodb_fast_shutdown=0; or specifyinnodb_fast_shutdown=0inside of themy.cnffile). - Back up all files related to InnoDB (
ibdata, .frm, .ibdandib_logfile*files) - Back up the contents of your
my.cnffile.
To take a physical backup of data in the MyISAM engine, simply take a copy of the .frm, .myd and .myi files.
Since a physical backup copies the table data files from one location to another, you can also use Percona XtraBackup. To take a physical backup using Percona’s tools, run the command:
xtrabackup –backup –parallel 4 –compress –target-dir /backup/
This command will take a compressed backup and store the data files inside of the /backup/ directory. This directory will contain the files representing your data including the ibdata1 file, the mysql.ibd file and also other .ibd files.
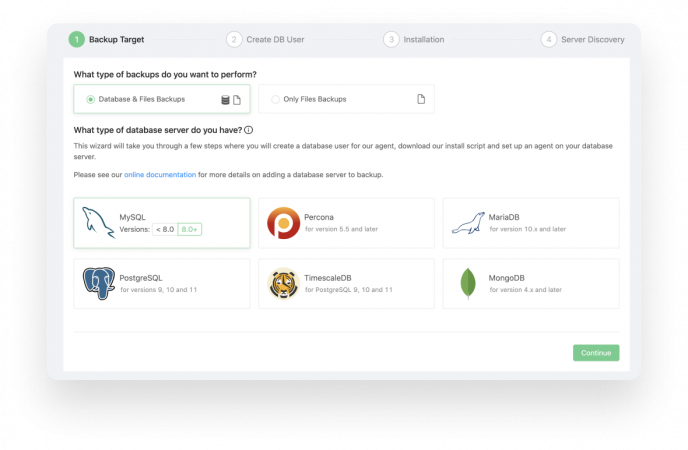
Physical and Logical Backups with Backup Ninja
Backup Ninja allows you to easily manage physical and logical backups. These types of backups can also easily be restored locally or on the cloud – you can choose what type of database you want to restore (the current list of the types of databases include MySQL, Percona, MariaDB and PostgreSQL) and restore your data by following the steps outlined on your screen. Backup Ninja can be configured to only back up files or back up both the database and files:
Verifying Your Backups
If you ask MySQL DBAs what can you do after you have taken a backup of your data they will probably advise you to verify the backup. When you hear such advice, don’t fret – it’s easier than it seems!
- Take the backup of your data.
- Restore it on a different server and run MySQL on the new data directory.
- Inspect the restored data and verify the table structure by issuing statements like
SHOW TABLES;
After you have verified your backup, you’re good to go!
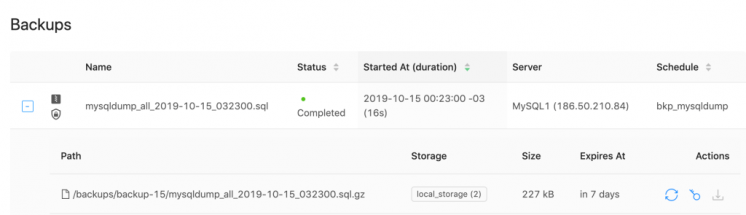
Verifying Your Backups with Backup Ninja
If you have taken your backup with mysqldump, first download your backup:
Now, decompress your backup (you can ignore this step if your backup is not compressed):
$ cat /path/to/backup.tar.gz | gunzip > backup.tar.decompressedAfter you’ve done that, restore the backup:
$ cat backup.tar.decrypted | mysql -h127.0.0.1 -uroot -pAfter you have restored your backup, inspect the restored data and verify the table structure – again, SHOW TABLES; can be your friend.
To restore backups using other tools (for example Percona XtraBackup or MariaDB Backup), take a look at Backup Ninja’s documentation.
Summary
We hope that this blog post taught you something new in the MySQL backup world. Keep in mind that MySQL offers quite a lot of ways to back up your data, but in general, backups can be categorized into two wide categories – physical backups and logical backups. A physical backup of your database is such a backup that backs up data at a system level while logical backups back up statements that recreate the data. As always, when backing up your MySQL data, keep security implications in mind, and when you’re done, always verify your backups.