blog
How to Build Your Own Object Storage using MinIO

Object storage is a strategy to store data in an object format. The objects have a unique identifier and a set of metadata to describe it. Unlike block storage, object storage does not use any structure, making it scalable and flexible storage. Scalability allows you to store unlimited amounts of data hence it is the best solution for data analytics, as it requires unlimited storage and efficiency of retrieval, and object storage is designed for this. Objects can be retrieved efficiently using the metadata. Also, there is no structure to their storage; retrieval is also much more accessible. Object storage is also a perfect solution for cold data storage such as backups or archives, which requires large storage.
Cloud providers offer object storage at different pricing plans which could depend on storage capacity and the frequency of retrieval. For example, if the data is for data analytics or eCommerce sites, the frequency of data retrieval is higher, so here the provider may provide the pricing bases on both storage and access frequency.
S3 Compliant Object Storage
Object storage is the underlying technology for a S3 compliant storage. S3 compliant storage is built on the S3 API allowing data storage as well as manage and retrieve object stores. Applications which comply with the S3 API can communicate easily with any S3 compliant storage.
Building Your 0wn S3 Object Storage
MinIO is an S3 compliant open source object storage server which means it can work with any application that works with Amazon S3. Following are the great features of MinIO:
- Allows plug and play with any S3 compliant application
- Offering a high-performance object storage
- No vendor lock-in as it is built on an open source platform
- Simple installation and configuration
- Designed and developed for the cloud and it is Kubernetes-friendly
Files in MinIO are organised in buckets which can be accessed with an access key, secret key, and the server address on the MinIO instance. The size of each object can be from only a few KB to a maximum of 5TB.
Setting Up MinIO Server on Mac
Step 1: Install Homebrew
To have MinIO setup on Mac, install the MinIO packages using Homebrew first. Homebrew is an open source package to allow easy installation of software on Apple’s macOS operating system and Linux.
Paste the following command from the Homebrew page on the macOS terminal to install Homebrew.
$ /bin/bash -c "$(curl -fsSL https://raw.githubusercontent.com/Homebrew/install/master/install.sh)"Step 2: Install MinIO Server
Now that you have successfully installed homebrew, the next step is to install the MinIO server with the following command.
$ brew install minioIf your installation is successful, you should have a successful message at the end.
Step 3: Starting up the MinIO server
$ minio server --address youripaddress:port fuOnce the server startup, you will get the Endpoint, AccessKey, and Secret Key display. You need this information to access the client and browser. It is recommended to change the Access Key and the Secret Key for security purposes.
Endpoint:  http://x.x.x.x:9000

AccessKey: PJJFTWJF2RXXXXXXXXXX

SecretKey: AhhOekzVECMpiYJPlj6bMrGGj6elZnXXXXXXXXXX

Browser Access:

   http://127.0.0.1:9000

Command-line Access: https://docs.min.io/docs/minio-client-quickstart-guide

   $ mc config host add myminio http://x.x.x.x:9000 PJJFTWJF2RXXXXXXXXXX AhhOekzVECMpiYJPlj6bMrGGj6elZnXXXXXXXXXX

Object API (Amazon S3 compatible):

   Go:         https://docs.min.io/docs/golang-client-quickstart-guide

   Java:       https://docs.min.io/docs/java-client-quickstart-guide

   Python:     https://docs.min.io/docs/python-client-quickstart-guide

   JavaScript: https://docs.min.io/docs/javascript-client-quickstart-guide

   .NET:       https://docs.min.io/docs/dotnet-client-quickstart-guide
Setting Up MinIO Client
Step 1: Install the minio client
$ brew install minio-mcStep 2: Configure the client
$ mc config host add minio http://x.x.x.x:9000 accessCode secretCodeStep 3: Create a bucket
Create a bucket called photos
$ mc mb minio/photosStep 4: Upload data
Upload some data to the bucket
$ mc cp ~/Downloads/s3.png minio/photos
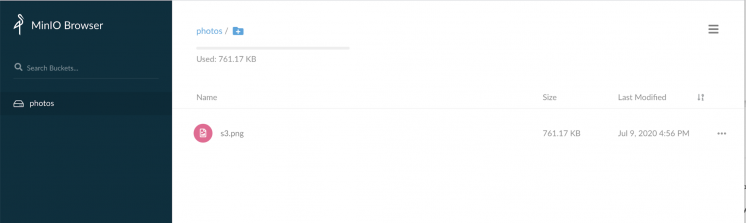
View the Data in MinIO Browser
Use the address given in the browser access to access MinIO with the given MinIO server information from the

Enter the access key and secret key to access the dashboard. On the dashboard, you will see the bucket called photos and the image uploaded using the MinIO client.
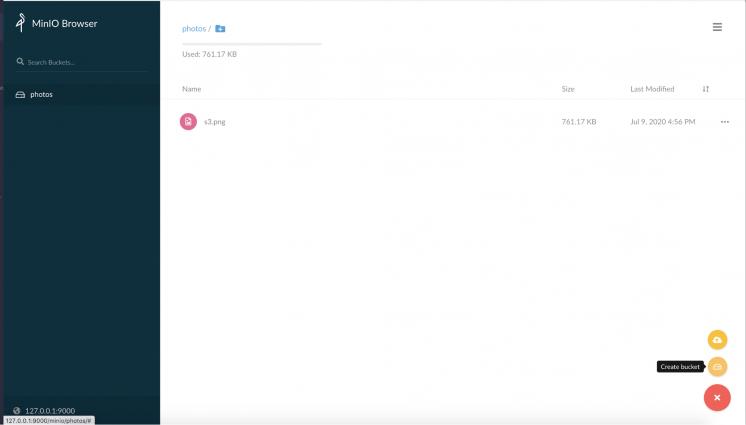
You can also choose to create the bucket via the web interface on the MinIO browser. All you need to do is click on the plus icon at the bottom of the interface. This will give you an option to create a bucket and upload files using the GUI.
Securing Access to Your MinIO Server With a TLS Certificate
Your MinIO server can be secured using a private key and public certificate from a certification authority(CA). A CA like LetsEncrypt will be able to provide a certificate to enable HTTPS on web servers, and Certbot for a free SSL certificate. Follow the steps on Certbot to get your certificate for your webserver.
Backup to S3 Compatible Storage Using Backup Ninja
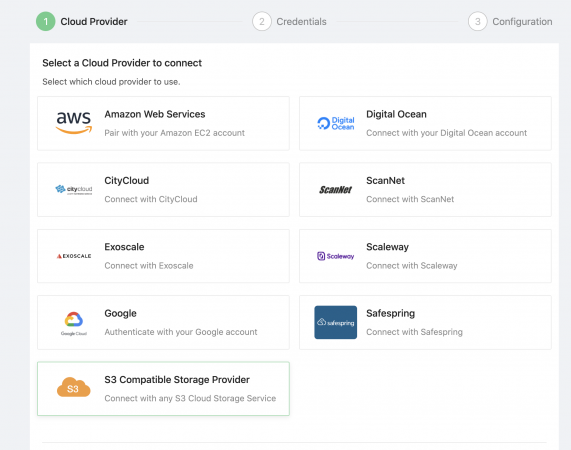
With the S3 compatible object storage, you have options to work with S3 compatible tools like Backup Ninja for automated backups. Backup Ninja offers safe and secure backup services to local or cloud storage. With Backup Ninja you can easily backup your open source databases like MySQL, MariaDB, MongoDB, PostgreSQL, and TimeScaleDB without any backup scripts to you the MinIO object storage. Follow these steps to configure MinIO as an S3 target on Backup Ninja.
Step1: Select the cloud provider.
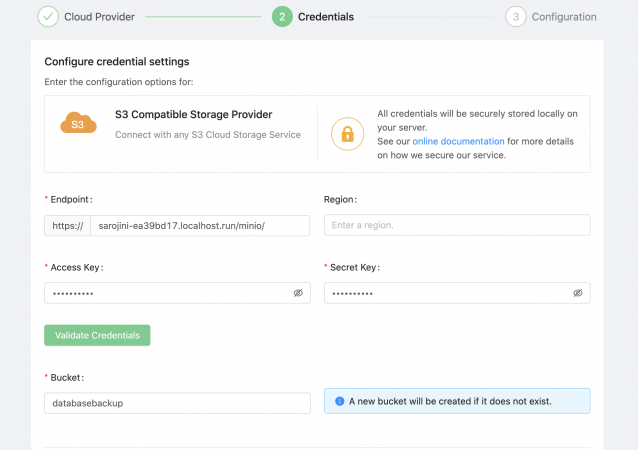
Step 2 : Fill in the cloud credentials. This is your server information, the access key, and the secret key which you get when you start your MinIO server.
And you would be able to see the cloud credentials created for your S3 compatible storage.

You can now use this to schedule your back up in a few steps as below.
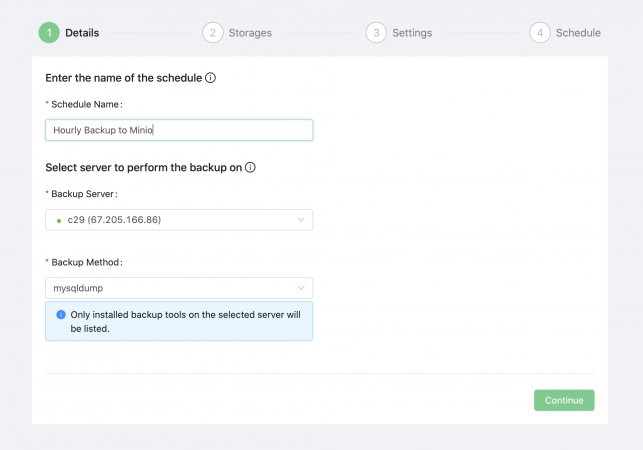
Step 1: Fill in the backup schedule details
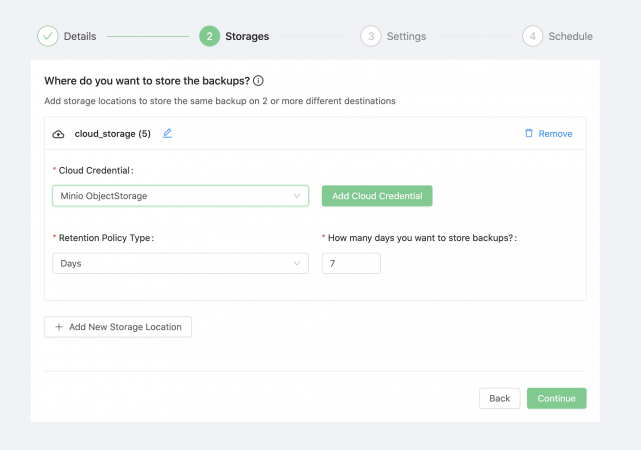
Step 2: Pick the S3 compatible storage you created earlier from the list.
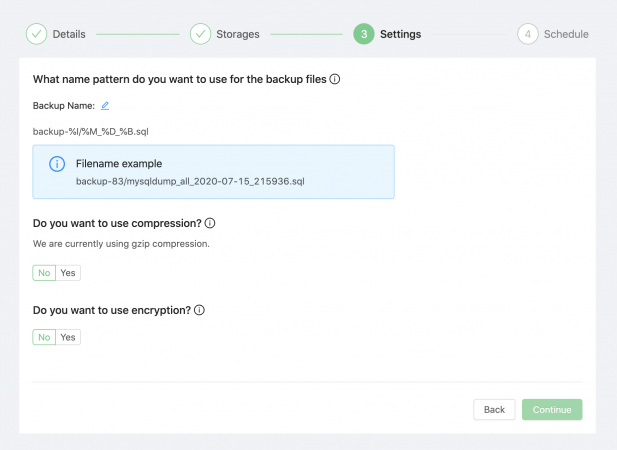
Step 3 : Fill in the settings for your backup or you can leave the settings to default.
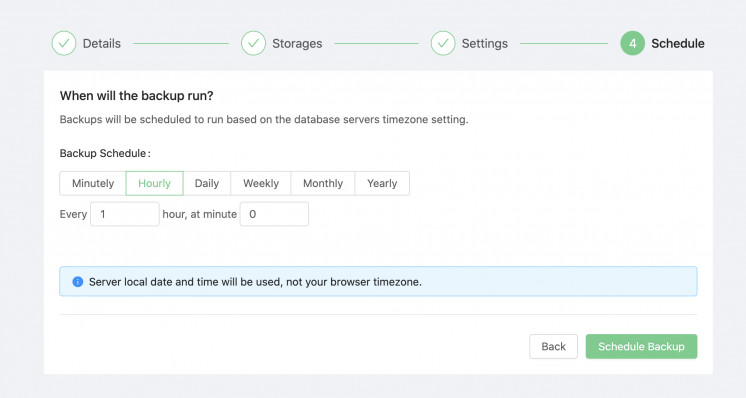
Step 4: Set the schedule for your backup duration.
Once you have completed this step, you can see the schedule for backup on the dashboard. You need to click on the play button to start the backup.

Conclusion
MinIO is a great option as a primary or extended storage to your current infrastructure. With the high-performance object storage, you can store large data like database backups and archives at minimal cost without any vendor lock-in. Data recovery during any disaster strike becomes easy as you are in total control of your backup storage. MinIO server is easy to set up and can connect securely from a web interface using Let’s Encrypt SSL/TLS certificate. Lastly, and probably the most distinctive feature of the MinIO, is its S3 compatibility, making it work seamlessly with any S3 compliant tool.