blog
Securing your Backup Storage on MinIO

A security consideration when setting up your custom storage using MinIO is encryption. By and large, setting up MinIO securely entails encryption in-transit using Transport Layer Security (TLS) certificates, Server-Side Encryption with Client-provided keys (SSE-C) or Server-Side Encryption with a Key Management Systems (KMS) encryption; that is, SSE-S3. The latter SSE encryption schemes allow you to encrypt your storage at-rest. In this blog, we’ll go over the inner workings of these encryption schemes in the context of MinIO. Securing your own S3-compatible storage is essential if you are using it to store your backups.
Securing Access to your MinIO storage server
Ideally, you should be able to secure access to your MinIO storage server using a private key and a public key certificate that you can generate on your own, or obtain from a third-party Certificate Authority (CA). Also, you have the option of using an existing private key and public key certificate pair.
Using an Existing Key and Certificates
Copy the existing private key and public key certificate to the default certs directory. The path to the certs directory is ${HOME}/.minio/certs in a Linux based OS.
Below are descriptions of the tools that you can use to generate a self-signed certificate:
Generating Self-signed Keys and Certificates
Use generate_cert.go to generate a certificate
- Download generate_cert.go at generate_cert.go
- Run the tool by specifying the CA and the host parameter as below:
go run generate_cert.go -ca --host "<IP_of_your_MinIO_host>"- You should get a response like below:
2018/11/21 10:16:18 wrote cert.pem

2018/11/21 10:16:18 wrote key.pem- Rename
cert.pemtopublic.crtandkey.pemtoprivate.key
Generate a certificate using Let’s Encrypt
- Install Certbot by the following documentation at Certbot.
- Generate a Let’s Encrypt certificate.
certbot certonly --standalone -d myminio.com --staple-ocsp -m [email protected] --agree-tos- Verify Certificates. List your certs saved
/etc/letsencrypt/live/myminio.comdirectory.
$ ls -l /etc/letsencrypt/live/myminio.com

     total 4

lrwxrwxrwx 1 root root  37 Aug  2 09:58 cert.pem -> ../../archive/myminio.com/cert4.pem

lrwxrwxrwx 1 root root  38 Aug  2 09:58 chain.pem -> ../../archive/myminio.com/chain4.pem

lrwxrwxrwx 1 root root  42 Aug  2 09:58 fullchain.pem -> ../../archive/myminio.com/fullchain4.pem

lrwxrwxrwx 1 root root  40 Aug  2 09:58 privkey.pem -> ../../archive/myminio.com/privkey4.pem

-rw-r--r-- 1 root root 543 May 10 22:07 README- Setup SSL on Minio Server with the Certificates. The certificate and key generated via Certbot needs to be placed inside the user’s home directory.
$ cp /etc/letsencrypt/live/myminio.com/fullchain.pem /home/user/.minio/certs/public.crt

$ cp /etc/letsencrypt/live/myminio.com/privkey.pem /home/user/.minio/certs/private.key- Change ownership of certificates.
$ sudo chown user:user /home/user/.minio/certs/private.key

$ sudo chown user:user /home/user/.minio/certs/public.crt- Start the MinIO server using HTTPS.
$ ./minio server --address ":443" /mnt/dataThird-Party Certificate Authority (CAs)
Certificates that were not generated with a known CA can be placed under the MinIO configuration which is ${HOME}/.minio/certs/CAs/ in a Linux based OS.
Securing your Backup/Object Storage on the Server-Side
Server-Side Encryption with client-provided (SSE-C) Keys
SSE-C enables an S3 client to encrypt/decrypt an object at the MinIO server. The S3 client sends a secret key as part of the HTTP request. This secret key is never stored by the MinIO server and only resides in RAM during the en/decryption process. The section below describes how to use server-side encryption with customer-provided encryption (SSE-C) keys via aws-cli.
- Install
aws-cliormcclient. - Create a bucket named my-bucket
aws --no-verify-ssl --endpoint-url https://localhost:9000 s3api create-bucket --bucket my-bucket- Upload an object using SSE-C with aws cli. The following example shows how to upload an object named
my-secret-diarywhere the content is the file ~/my-secret-diary-object.txt. Note that you should use your own encryption key.
aws s3api put-object \

  --no-verify-ssl \

  --endpoint-url https://localhost:9000 \

  --bucket my-bucket --key my-secret-diary \

  --sse-customer-algorithm AES256 \

  --sse-customer-key MzJieXRlc2xvbmdzZWNyZXRrZXltdXN0cHJvdmlkZWQ= \

  --sse-customer-key-md5 7PpPLAK26ONlVUGOWlusfg== \

--body ~/my-secret-diary-object.txt- Display Object Information. Specify the correct SSE-C key of an encrypted object to display its metadata:
aws s3api head-object \

  --no-verify-ssl \

  --endpoint-url https://localhost:9000 \

  --bucket my-bucket \

  --key my-secret-diary \

  --sse-customer-algorithm AES256 \

  --sse-customer-key MzJieXRlc2xvbmdzZWNyZXRrZXltdXN0cHJvdmlkZWQ= \

  --sse-customer-key-md5 7PpPLAK26ONlVUGOWlusfg=
Server-Side Encryption with a Key Management System (SSE-S3)
MinIO uses a key management system (KMS) when auto-encryption is enabled. The MinIO server encrypts each object with a unique object key. The unique object key is protected by a master key that resides on the KMS. Below is an illustration for the setup of a MinIO application that interacts with a KES Server which interacts with a single KMS.
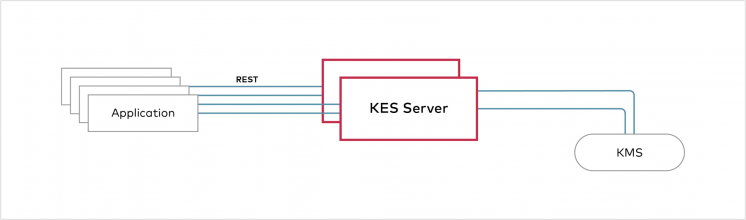
The section describes how to set up a KMS system using MinIO’s KES project.
- Install and run a KES server from minio/kes docker repository.
- Fetch the private key and public key certificate to authenticate to the KES server as the root identity.
curl -sSL --tlsv1.2 \

     -O 'https://raw.githubusercontent.com/minio/kes/master/root.key' \

-O 'https://raw.githubusercontent.com/minio/kes/master/root.cert'- Set the MinIO KES configuration.
export MINIO_KMS_KES_ENDPOINT=https://<ip_of_your_KES_server>:<Port>

export MINIO_KMS_KES_KEY_FILE=root.key

export MINIO_KMS_KES_CERT_FILE=root.cert

export MINIO_KMS_KES_KEY_NAME=my-minio-key- Start the MinIO Server.
export MINIO_ACCESS_KEY=minio

export MINIO_SECRET_KEY=minio123

minio server ~/export
Essentially, this kind of setup allows an S3 client to en/decrypt an object at the MinIO server using a KMS. The MinIO server assumes that the KMS provides two services:
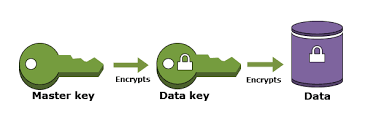
- GenerateKey – Takes a Key ID and generates a new data key from a master key referenced by the key ID. It returns the new data key in two different forms: The plain data key and the data key encrypted using the master key.
- DecryptKey – Takes a key ID and an encrypted data key and returns the plain data key – the decryption of the encrypted data key using the master key referenced by the key ID.
The MinIO server normally requests a new data key from the KMS for each object that is uploaded by the S3 client. Then it stores the encrypted form of the data key and the master key ID as part of the object metadata. The plain data key only resides in RAM during the en/de-cryption process. The KMS is treated as a trust component that performs key sealing/unsealing to build a key hierarchy.
MinIO KMS deployment can use the following KMS technologies: Hashicorp Vault, AWS-KMS + Secret Manager, or File System Keystore (FS).
KMS Auto-Encryption
You can instruct the MinIO server to encrypt all objects with keys from the KES server even if an S3 client does not specify the encryption header when an object is uploaded. Auto-Encryption will ensure that all data stored on MinIO is encrypted before it is stored. To enable auto-encryption you can set the auto-encryption environment variable to on as shown below:
export MINIO_KMS_AUTO_ENCRYPTION=onConclusion
When setting up a MinIO object storage server, in-transit, and at-rest encryption should be considered to ensure your object/backup storage is secure and compliant at the very least. In Backup Ninja, it is possible to configure your own MinIO-based S3 endpoint as storage target for your database and file backups.